Grade 10-11 Lesson 2

Lesson 2 — Managing Files & Folders
FET Digital Skills Programme | Grade 10–11
| In Lesson 1 we learned how computers work and what makes up a computer system. In this lesson we move from understanding the machine to working with it effectively. Every day you will create, save, and retrieve files on a computer. If those files are not organised, you will lose work, waste time, and become frustrated. By the end of this lesson, you will have a professional filing system set up and ready to use for the rest of your school career. |
1. What Are Files and Folders?
A file is a collection of data stored on a computer under a single name. Just like a page in your exercise book, a file holds specific content, it could be text you have written, a photograph, a video clip, a piece of music, or a computer program. Every file has three important parts:
- File Name – the label you give the file so you can identify and find it (e.g., History_Essay_Term1).
- File Extension – the letters after the dot that tell the computer what type of file it is (e.g., .docx, .pdf, .jpg, .mp4).
- File Content – the actual data or information stored inside the file.
A folder (also called a directory) is a container used to organise files on a computer. Think of a folder exactly like a physical file folder or a drawer in a filing cabinet it groups related files together so that they are quick to find. Folders can be placed inside other folders, creating a tree-like structure called a folder hierarchy.
Common File Types and Their Extensions
| File Extension | Type of File | Commonly Used For |
| .docx | Word Document | Essays, reports, letters |
| PDF Document | Sharing documents that must not be changed | |
| .xlsx | Spreadsheet | Data, budgets, tables and calculations |
| .pptx | Presentation | Slideshows and visual presentations |
| .jpg / .png | Image File | Photographs and diagrams |
| .mp4 | Video File | Video clips and recordings |
| .mp3 | Audio File | Music and audio recordings |
| .txt | Plain Text File | Simple notes with no special formatting |
Folder Hierarchy — Nested Folders
Folders can be placed inside other folders. Using nested folders makes it easier to organise large numbers of files into logical groups. The diagram below shows how a School Digital Portfolio might be structured.
| 📂 Example Folder Structure |
| My Documents |
| └── School |
| ├── Mathematics |
| │ ├── Assignments |
| │ └── Notes |
| └── English |
| ├── Essays |
| └── Resources |
2. Creating Folders
Creating a clear folder structure before you begin saving files will save you a great deal of time and frustration later. A well-organised system means you can find any file within seconds, protect important work from being misplaced, and share your work with teachers and classmates efficiently.
How to Create a New Folder on Windows
Step-by-Step: Creating a New Folder (Windows)
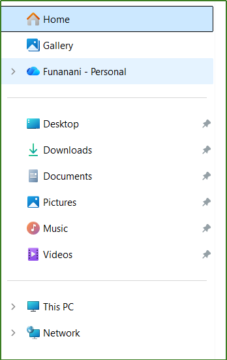
Step 1: Open File Explorer by pressing the Windows key + E on the keyboard. |
| Step 2: Navigate to the location where you want to create the new folder.
|
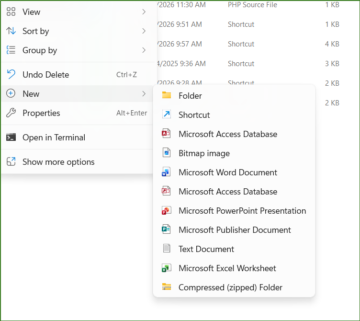
| Step 3: Right-click on an empty space inside the folder window.
Step 4: Select New > Folder from the context menu that appears.
|
| Step 3: A new folder appears named “New folder” — type the name you want.
Step 4: Press Enter to confirm the name. |
Naming Folders: Best Practices
A good folder name tells you exactly what is inside without needing to open it. Follow these naming rules:
- Use clear, descriptive names (e.g., Grade10_Mathematics — not “Stuff” or “Folder1”).
- Use underscores ( _ ) or hyphens ( – ) instead of spaces (e.g., Life_Sciences_Notes).
- Avoid special characters: the following are not allowed in file names: / \ : * ? ” < > |
- Keep names short but meaningful.
- Use capital letters at the start of each word for readability (e.g., Physical_Science).
 |
Common Mistake to Avoid
Do NOT save all your files in one place with no folders. Saving 50 files directly onto the Desktop with no organisation makes it nearly impossible to find what you need. Always create a folder first, then save files inside it. |
3. Renaming, Moving, and Deleting Files
3.1 Renaming Files and Folders
Renaming allows you to give a file or folder a more descriptive or organised name. You should rename files when a file has a vague default name (such as “Document1” or “Untitled”), when you need to include a date or version number, or when following a naming convention for your digital portfolio.
| Step-by-Step: Renaming a File or Folder (Windows)
1. Locate the file or folder you want to rename in File Explorer. 2. Right-click on the file or folder. 3. Select Rename from the context menu.
4. The name will be highlighted. Type the new name. 5. Press Enter to save the new name. |

Keyboard shortcut: Select the file and press F2.
3.2 Moving Files and Folders
Moving a file takes it from one location and places it in another. The original file is removed from its old
location this is different from copying, which creates a duplicate.
| Method 1: Drag and Drop
6. Open File Explorer and navigate to the file you want to move. 7. Click and hold the file with the mouse. 8. Drag it to the destination folder (visible in the left navigation panel). 9. Release the mouse button to drop the file into the folder. |
| Method 2: Cut and Paste
10. Right-click the file and select Cut (or press Ctrl + X). 11. Navigate to the destination folder. 12. Right-click inside the folder and select Paste (or press Ctrl + V). |
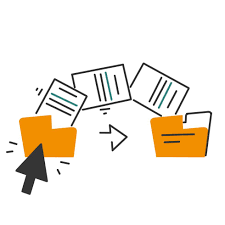
3.3 Copying Files and Folders
Copying creates a duplicate of a file. The original stays in its current location and an identical copy is placed in the new location. Use Ctrl + C to copy a file and Ctrl + V to paste the copy into the destination folder.
3.4 Deleting Files and Folders
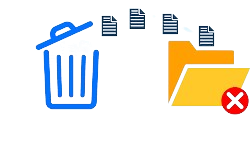
Deleting a file moves it to the Recycle Bin. Files in the Recycle Bin can be restored. Once the Recycle Bin is emptied, those files are permanently deleted and cannot be recovered.
| Action | What Happens | How to Do It |
| Delete | File moves to Recycle Bin (recoverable) | Right-click → Delete, or press Delete key |
| Restore | Returns file from Recycle Bin to its original location | Open Recycle Bin → Right-click file → Restore |
| Permanent Delete | Removes file instantly cannot be recovered | Select file → Shift + Delete |
| Empty Recycle Bin | Permanently clears all files from the Recycle Bin | Right-click Recycle Bin on Desktop → Empty Recycle Bin |
 |
Be Careful!
Before deleting anything, ask yourself: do I still need this file? If you are unsure, move it to an “Archive” folder instead of deleting it permanently. |
4. Introduction to Google Drive and Google Workspace
4.1 What Is Google Workspace?
Google Workspace is a collection of free, cloud-based tools created by Google. These tools allow you to create, store, and share documents, presentations, spreadsheets, and much more all from any device connected to the internet. You do not need to install any software; everything runs inside a web browser.
| Google App | What It Does | Desktop Equivalent |

Google Drive |
Stores and organises all your files in the cloud |
File Explorer |
Google Docs |
Creates and edits text documents | 
Microsoft Word |

Google Sheets |
Creates spreadsheets and performs calculations |
Microsoft Excel |
Google Slides |
Creates presentations and slideshows | 
Microsoft PowerPoint |
Google Forms |
Creates surveys, quizzes, and online forms |
Microsoft Forms |

Gmail |
Sends and receives email messages | 
Microsoft Outlook |

Google Meet |
Video calls and online meetings |  
Zoom / Microsoft Teams |
5.2 What Is Cloud Storage?
Cloud storage means your files are saved on remote servers which are powerful computers owned by companies like Google that you can access over the internet from any device. This is different from local storage, where files exist only on the hard drive of one specific computer.

5.3 Getting Started with Google Drive
To use Google Drive you need a Google account (a Gmail address).
| How to Access Google Drive
1. Open a web browser (e.g., Google Chrome). 2. Type drive.google.com in the address bar and press Enter. 3. Sign in using your Google account email address and password. 4. Your Google Drive homepage will open, showing any files you have already saved. |
5.4 The Google Drive Interface
When you open Google Drive you will see a sidebar on the left and a main content area on the right. The diagram below shows the key areas of the interface.
| Area | What It Does |
| My Drive | Your personal storage space, all your files and folders are stored here. |
| Shared with me | Files and folders that other people (such as your teacher) have shared with you. |
| Recent | Shows the files you have opened or edited most recently. |
| Starred | Files you have marked as important for quick access. |
| Trash | Deleted files (can be restored within 30 days of deletion). |

5.5 Creating Folders in Google Drive
| Step-by-Step: Creating a Folder in Google Drive
2. Click the
3. Select New folder from the dropdown menu.
4. A dialog box appears. Type the name of your folder.
5. Click Create. The new folder will appear in My Drive. |
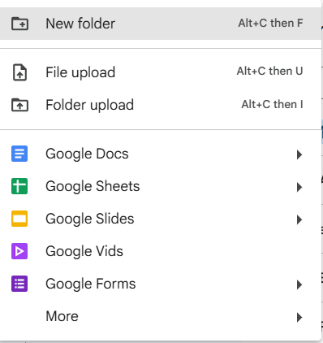 1. Open Google Drive and make sure you are in “My Drive”.
5.6 Uploading Files to Google Drive
| Step-by-Step: Uploading a File to Google Drive
2. Click the 3. Select File upload from the menu. 4. A file browser window will open. Locate and select the file on your computer. 5. Click Open. A progress bar will appear at the bottom of the screen. 6. Once complete, the file will appear inside your current folder. |
 1. Open Google Drive and navigate to the folder where you want to upload.
5.7 Sharing Files in Google Drive
One of the most powerful features of Google Drive is the ability to share files and folders with other people. When you share a file, you choose the permission level this controls what the other person is allowed to do with your file.

| Step-by-Step: Sharing a File with Your Teacher
2. Select Share from the context menu (or click the Share button at the top of the page when the file is open).
3. In the “Add people and groups” box, type your teacher’s email address.
5. You can add a brief message in the message box (e.g., “Dear [Teacher], please find my Lesson 2 assignment attached.”).
6. Click Send. Your teacher will receive an email notification with a link to the file. |
 1. Right-click on the file/folder you want to share in Google Drive.
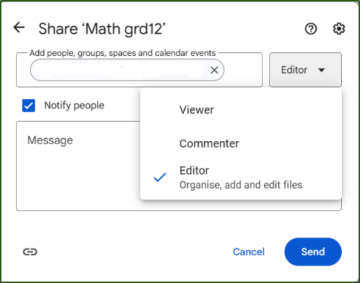 4. Click the permission dropdown next to the email address and select Viewer, Commenter, or Editor as required.
|
Important: Sharing Safely
Always choose the most restrictive permission that still allows the other person to do what they need. For submitting assignments to a teacher, Viewer access is normally sufficient. Never use the “Anyone with the link” setting unless your teacher specifically requests it. |
Lesson Activities
| ACTIVITY 1: CREATE YOUR SCHOOL DIGITAL PORTFOLIO FOLDER STRUCTURE |
| Instructions:
1. On your in Google Drive), create a main folder called: School_Digital_Portfolio 2. Inside School_Digital_Portfolio, create a subfolder for each of the weeks you will be doing the Basic Digital Skills programme. 3. Inside each week folder, create two subfolders: Final_Submissions and Drafts. 4. Share the main School_Digital_Portfolio folder with your teacher
Your completed structure should look like this: School_Digital_Portfolio ├── Week1 │ ├── Final_Submissions │ └── Drafts └── Week2 (repeat for all weeks)
Checklist: • Main folder School_Digital_Portfolio created with correct spelling. • At least 8 weeks subfolders created inside. • Each week folder contains both Final_Submissions and Drafts subfolders. • All folder names use correct naming conventions (no spaces, meaningful names). • The main Folder is shared with the teacher. |